[asp.net] MVC 에서 viewModel과 model 매핑 및 편집 방법
ASP.NET MVC Basics Part 2: ViewModel to Model Mapping and Editing
In Part 1, I walked through creating a simple form with a backing ViewModel and Validation. In Part 2, I’ll walk through creating a backing Model and Edit functionality.
To start off from here, load up the code from part1: https://github.com/eandersen-mdsol/mvcformtutorial/tree/part1
The final code for Part 2 will be uploaded here: https://github.com/eandersen-mdsol/mvcformtutorial/tree/part2
Model Mapping flow
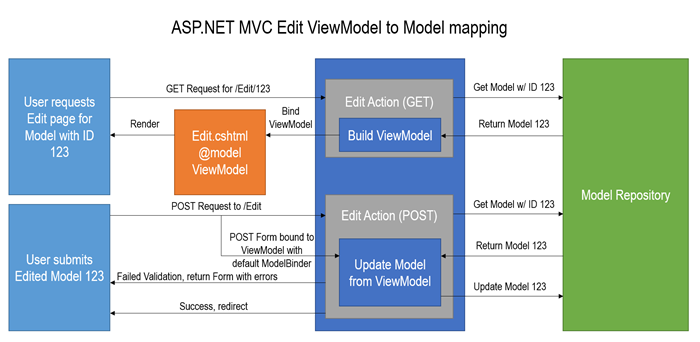
When editing a ViewModel, we need to prepopulate the view with real data from a domain model. This can be a database table mapped to an object via an ORM or data from another source. In the diagram above, we can see the GET Edit action requesting Model with an ID of 123 from the Repository holding the model data, creating a ViewModel that represents the Model and passing it onto the View to render. POSTing the data back is similar to the Create POST method in Part 1, except we load the existing Model from the repository, update it with the validated data from the ViewModel and update the model in the Repository.
Creating the Model and Repository
Lets continue from Part 1 and create a Book Model to match the BookViewModel we already have. Again, this is a simple POCO which you can decorate with attributes. Create the following class in the Models folder:
Next up is a data store. In a real project you would want to put this class in another project as a shared library, but for the purposes of this exercise, create a new folder called “Repositories” and create an interface for the BookRepository called IBookRepository.cs:
This very simple interface is all we need. Lets implement an in-memory, static BookRepository. Create a file called StaticBookRepository.cs:
The list of Books in this Repository will only persist while the application is running (or until the AppPool is restarted) so is useless for real projects. It will however suffice for now. If you want to migrate this to an Entity Framework ORM-backed Repository later, you can reimplement IBookRepository.
Updating the Create action to save the Book
Back in the BookController, we had a TODO to save the book. Now is the time to do it, but we have to first map the validated ViewModel to the Model. Create a new method on the BookController:
In real projects and definitely for larger models, you’ll want to use something like AutoMapper. This and other mapping methods could either be in the Controller class or as methods on the ViewModel itself. For very simple cases you can skip the ViewModel step all together and pass the Model directly to the View, but you’ll quickly find cases where this becomes impractical – in addition, if your model has public Properties that should not be set by the user, a specially crafted POST could cause the default ModelBinder to set public Properties on your Model – an “Insecure Direct Object Reference”. Github fell foul to this problem a while ago and was hacked due to database Models being updated directly from POST requests.
The BookController now needs access to the BookRepository. Add a new member variable to reference the newly created StaticBookRepository:
In most projects you’ll see the actual variable value injected in using Dependency Injection. Note how the type of the variable is an interface, so you can swap in a different BookRepository implementation and the rest of the code will be none the wiser. This is coding to contracts and you’ll need to do it to keep your code testable and modular.
Lets update the Create (POST) action to actually now save the book.
Stepping through the new code inside the ModelState.IsValid conditional, we see that we set the Id of the ViewModel to a new Guid (because it will be Guid.Zero at the moment), create a new Book model object, update the values of it from the ViewModel and Insert it into the Repository with the Upsert method. If you get creative with breakpoints, you can now see the book has been inserted into the repository but for now you won’t see anything different if you run the app.
Displaying the list of Books
To see the results of our handiwork, we have to update the Index action to show the list of Books. Updating the Index action is easy:
This simply passes all the books through to the View as the view’s backing model. To display the data, update the Index view to use the new Model type (IEnumerable<Book>) and to contain a table with the data – while we are at it, we’ll include a link to the Edit action that we will create shortly:
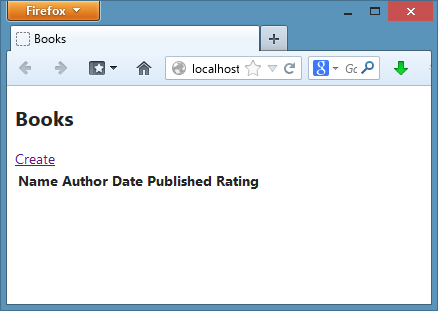
Now lets test out our new form! You will at first see no data:
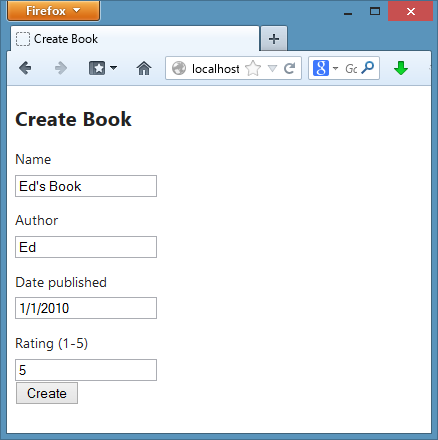
Click “Create” and fill in the form:
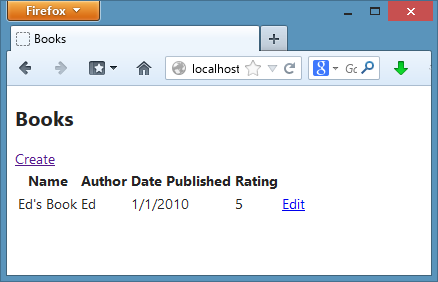
You’ll see the table populated with the Book you just created. Awesome!
Edit functionality
With the groundwork for Create laid down, we can reuse most of our existing code to create the Edit functionality outlined in the diagram at the top of this post. Lets create the View first, Edit.cshtml alongside Create.cshtml:
You’ll notice that we have not included all of the form elements in the Edit view, and we haven’t copy and pasted all the elements from the Create view, as that would not be DRY. Lets extract the Form elements out of Create.cshtml into a new Partial view, “_Form”. Create “_Form.cshtml” alongside Edit.cshtml and copy/paste the form elements from Create.cshtml. Don’t forget to set the model type of the view to BookViewModel:
Also update the Create.cshtml view to use the new Partial View instead. Your project should now look like this:
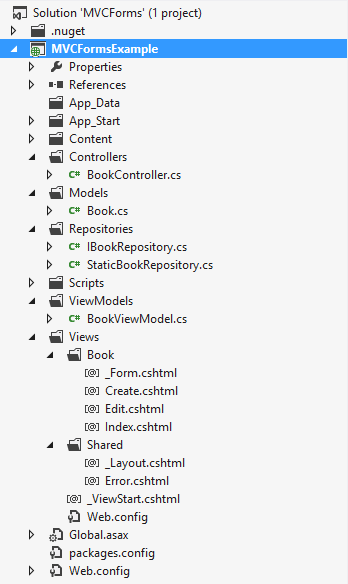
Test your Create action again to make sure it all still works. With the Edit view done, we can work on the Controller. First, add a method to the BookController for creating a new ViewModel from an existing Book:
This is the counterpart to the UpdateBook method, mapping in the other direction. Finally, add two new Actions for Edit, one for GET and one for POST, very similar to the Create methods:
Lets walk through these two methods. The first is the GET method, which gets a book by the id parameter that was mapped from the route /Edit/{id}. It then returns a 404 Not Found result if the BookRepository returned null. Finally, it returns the Edit view with a new BookViewModel containing data from the book, mapped by the ViewModelFromBook method. The POST method first checks that the ViewModel is valid using the standard Validation rules, gets the existing book from the BookRepository, updates the book values from the ViewModel, updates the book in the Repository with the Upsert method and finally redirects to the Index method.
Now time to test it! Fire up the app and create a book as before. Or create two books!
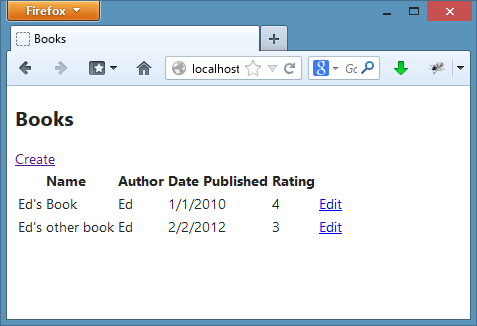
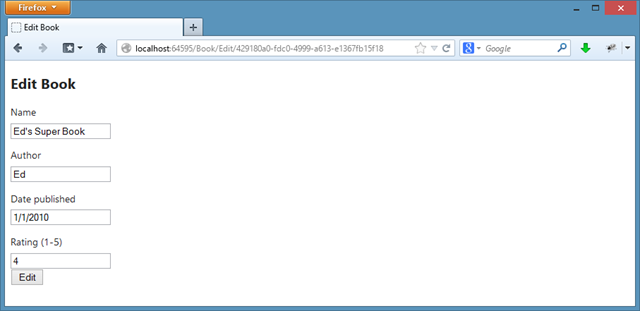
Click the Edit button and the Edit (GET) action will load up. Note in the screenshot below that the Id of the Book you selected is part of the MVC route – this was mapped to the id parameter of the Edit method. Change some data:
Clicking the Edit button will update the Book model and you’ll see the updated list:
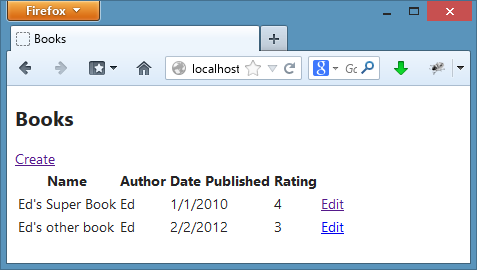
And there you have it! You now have a very primitive in-memory database of books.
Summary
In this part of the tutorial, we looked at creating a Model, a Repository interface with a static, in-memory implementation, mapping between the ViewModel and Model, updated the Index view to show all the Books, updated the Create action to actually save the data and created an Edit action and View. Phew! In Part 3, I’ll look at creating a separate list of Authors and creating a Drop down <select> list to select from when editing a Book.
'Web > ASP.NET MVC' 카테고리의 다른 글
| [asp.net] json 문자를 커스텀 객체로 변환 (2) | 2015.04.27 |
|---|---|
| [asp.net] Automapper to merge class (2) | 2015.04.27 |
| Introducing ASP.NET MVC 3 (Preview 1) (2) | 2015.04.27 |
| [asp.net] json 데이터를 mvc controller 로 보낼때 (2) | 2015.04.27 |
| [Asp.net] MVC Controller 에서 jQuery로 동적으로 데이터 얻는 방법 (2) | 2015.04.27 |