Grunt 소개 및 사용법
Grunt 소개 및 사용법
출처 : http://nuli.navercorp.com/sharing/blog/post/1132682

환경설정
Grunt와 Grunt Plugin의 설치와 관리는 npm(package manager for Node.js)을 통해서 이루어지기 때문에, 우리는 Grunt를 사용하기 위해 Node설치가 필요하다.
(다운 링크 : http://www.nodejs.org)
사용방법
$ npm install -g grunt-cli |
$ npm install grunt --save-dev |
$ npm init |
package.json |
{ "name": "NFEAS", "version": "0.0.1", "private": true, "scripts": { "start": "node ./bin/www" }, "dependencies": { "body-parser": "~1.2.0", "cookie-parser": "~1.1.0", "cron": "^1.0.4", "debug": "~0.8.1", "ejs": "^1.0.0", "express": "~4.3.0", "jade": "~1.3.1", "mongoose": "~3.8.0", "morgan": "~1.1.1", "mysql": "^2.3.2", "request": "^2.37.0", "serve-favicon": "~2.0.0" }, "main": "app.js", "devDependencies": { "grunt": "^0.4.5" //grunt가 최신버전으로 설치됨을 확인 }, "author": "", "license": "ISC" } |
4. Gruntfile.js 파일 생성
package.json과 같은 위치(프로젝트 폴더의 root경로)에 Gruntfile.js를 생성한다. (Grunt가 실행될 때, 이 파일을 보고 어떠한 동작을 할지 결정하는데 쓰인다.)
Gruntfile.js |
module.exports = function(grunt) { // Project configuration. grunt.initConfig({ pkg: grunt.file.readJSON('package.json'), //uglify 설정 uglify: { options: { banner: '/* <%= grunt.template.today("yyyy-mm-dd") %> / ' //파일의 맨처음 붙는 banner 설정 }, build: { src: 'public/build/result.js', //uglify할 대상 설정 dest: 'public/build/result.min.js' //uglify 결과 파일 설정 } }, //concat 설정 concat:{ basic: { src: ['public/js/common/util.js', 'public/js/app.js', 'public/js/lib/.js', public/js/ctrl/.js'], //concat 타겟 설정(앞에서부터 순서대로 합쳐진다.) dest: 'public/build/result.js' //concat 결과 파일 } } }); // Load the plugin that provides the "uglify", "concat" tasks. grunt.loadNpmTasks('grunt-contrib-uglify'); grunt.loadNpmTasks('grunt-contrib-concat'); // Default task(s). grunt.registerTask('default', ['concat', 'uglify']); //grunt 명령어로 실행할 작업 };
|
5. 사용을 원하는 Grunt Plugin 설치
여기서는 grunt-contrib-concat 플러그인 설치를 예로 든다.
$ npm install grunt-conrib-concat --save-dev |
설치가 완료되면, package.json의 devDependencies를 확인한다.
package.json |
{ "name": "NFEAS", "version": "0.0.1", "private": true, "scripts": { "start": "node ./bin/www" }, "dependencies": { "body-parser": "~1.2.0", "cookie-parser": "~1.1.0", "cron": "^1.0.4", "debug": "~0.8.1", "ejs": "^1.0.0", "express": "~4.3.0", "jade": "~1.3.1", "mongoose": "~3.8.0", "morgan": "~1.1.1", "mysql": "^2.3.2", "request": "^2.37.0", "serve-favicon": "~2.0.0" }, "main": "app.js", "devDependencies": { "grunt": "^0.4.5", "grunt-contrib-concat": "^0.5.0" //grunt-contrib-concat이 제대로 설치됨. }, "author": "", "license": "ISC" }
|
6. 실행하기
grunt 명령어로 실행한다. 정의해놓은 복수 개의 플러그인을 동시에 실행시킬 수 있다. 개별 실행을 시키고 싶다면 ‘grunt 플러그인이름’으로 실행하면 된다. 예) grunt concat
$ grunt |
✓ 자주 쓰이는 Grunt Plugin
여기서는 자주 혹은 유용하게 쓰이는 grunt의 플러그인과 그에 따른 옵션들을 간추려 설명한다.
'banner', 'footer'와 같이 여러 플러그인에서 동일하게 쓰이는 option들에 대한 설명은 반복하지 않는다.
grunt-contrib-concat
File을 통합한다.
Options
separator
파일이 통합되는 지점에 들어갈 string 설정
banner
파일이 통합된 output 파일 최상단의 banner string을 설정
footer
'banner'와 같은 방식으로, 통합된 파일의 최하단에 위치하는 string을 설정
stripBanners
각각의 파일에 쓰여있는 JavaScript banner comments를 제거
· false - 제거하지 않는다.(default)
· true - / ... / 은 제거되지만, /! ... /은 제거되지 않는다.
· options
block : true 인 경우, 모든 block comments 제거
line : true 인 경우, 모든 // 라인 제거
//example
package.json |
module.exports = function(grunt) { // Project configuration. grunt.initConfig({ pkg: grunt.file.readJSON('package.json'), concat:{ options: { banner: '/ <%= grunt.template.today("yyyy-mm-dd") %> / ', //동작 시점의 날짜가 출력 separator: '/ concat separator /', stripBanners: { force: true, all: true } }, basic: { src: [ 'public/js/common/util.js', 'public/js/app.js', 'public/js/ctrl/.js' ], dest: 'public/build/result.js' } } }); // Load the plugin that provides the "concat" task. grunt.loadNpmTasks('grunt-contrib-concat'); // Default task(s). grunt.registerTask('default', ['concat']); };
|
grunt-contrib-uglify
UglifyJS를 통한 file minifying.
Options
banner
mangle
· false - 변수명과 함수명의 변형을 막는다.
compress
· dropconsole
true - console 출력문 제거
beautify
· true - 코드의 syntax 유지
preserveComments
· false - 모든 주석 제거
· 'all' - '!'로 시작하는 주석만 보존
//example
package.json |
module.exports = function(grunt) { // Project configuration. grunt.initConfig({ pkg: grunt.file.readJSON('package.json'), uglify:{ options: { mangle: false, compress: { dropconsole: true }, beautify: true }, build: { src: 'public/build/result.js', dest: 'public/build/result.min.js' } }); // Load the plugin that provides the "uglify" task. grunt.loadNpmTasks('grunt-contrib-uglify'); // Default task(s). grunt.registerTask('default', ['uglify']); };
|
grunt-contrib-jshint
JSHint를 통한 file Validation.
Options
force
· true - error 검출 시 task를 fail시키지 않고 계속 진단
reporter
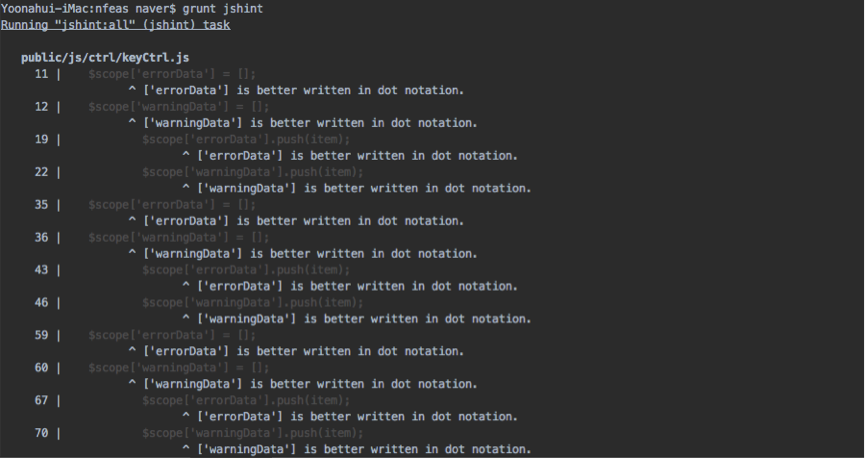
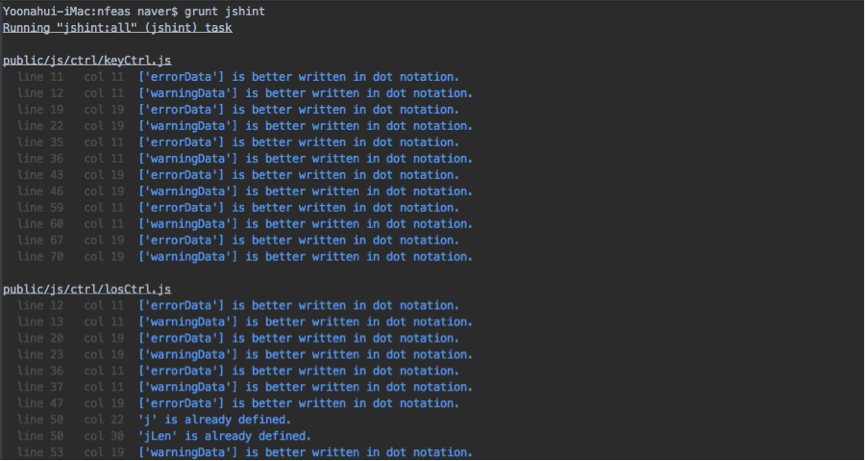
· output을 modifying할 수 있는 옵션 (jshint-stylish 설치 : $npm install jshint-stylish --save-dev)
//example
package.json |
module.exports = function(grunt) { // Project configuration. grunt.initConfig({ pkg: grunt.file.readJSON('package.json'), jshint:{ all: ['app.js', 'public/js/common/.js', 'public/js/ctrl/.js'], options:{ reporter: require('jshint-stylish') } } }); // Load the plugin that provides the "jshint" task. grunt.loadNpmTasks('grunt-contrib-jshint'); // Default task(s). grunt.registerTask('default', ['jshint']); }; |
( jshint default output )


package.json |
module.exports = function(grunt) { // Project configuration. grunt.initConfig({ pkg: grunt.file.readJSON('package.json'), cssmin:{ minify:{ expand: true, cwd: 'public/css/', src: ['*.css', '!Nwagon.css'], dest: 'public/build/css', ext: '.min.css' }, options:{ keepSpecialComments: 0 } } }); // Load the plugin that provides the "cssmin" task. grunt.loadNpmTasks('grunt-contrib-cssmin'); // Default task(s). grunt.registerTask('default', ['cssmin']); };
|
'Web > javascript / jQuery' 카테고리의 다른 글
| use strict 사용 이유 (4) | 2016.08.01 |
|---|---|
| 자바스크립트 closure 이해하기 (4) | 2016.07.18 |
| 숫자 자릿수 맞추기. (637) | 2016.05.31 |
| 공용 자바스크립트 - common_u (4) | 2016.05.25 |
| 내 기준 유용한 js / jquery 플러그인 (4) | 2016.05.23 |